Showing posts with label crafting. Show all posts

Saturday, August 17, 2013

August Exhaustion

This morning I woke up to a fiery-hot pain in my shoulder. In fact, my entire right arm feels fit to fall right off. I think I've managed to figure out why...


...I've been knitting. A LOT.


...picking, washing chopping, slicing and grating dozens of pounds of squash.


...cutting and trimming up fifty-bajillion bars of soap.


...hand wrapping and labeling those same fifty-bajillion bars of soap.

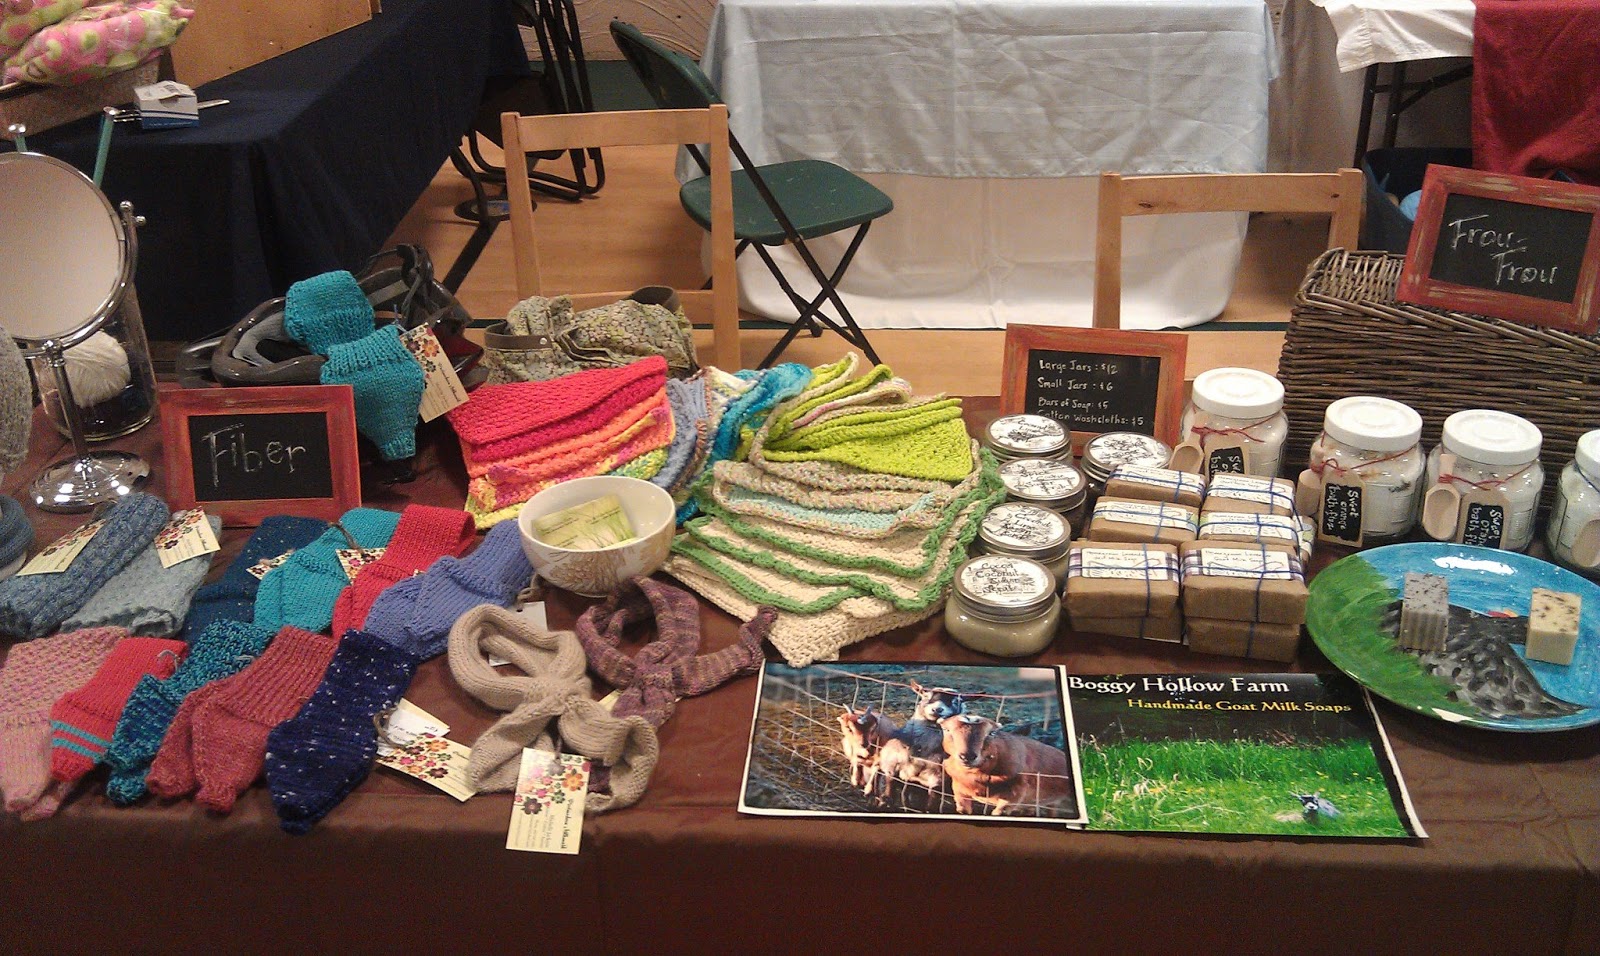
Yes, my house is in ruins right now, but aren't my knits and soaps purty?! That 40ish pounds of squash that I put into the freezer last night is a different kind of purty. I feel very pleased with my level of productivity, but madre, my arm! :\

Saturday, July 20, 2013

Knitting Project: Little Ladders Dishcloth

Yet another in my endless series of simple dishcloth patterns, Little Ladders is based on the slipstitch tweed stitch, with one small modification. After you get a row or two into it, it becomes blissfully mindless. :)


Little Ladders Dishcloth

I make these dishcloths using worsted weight kitchen cotton and size 8 straight needles, but you can go bigger or smaller easily, as your yarn or gauge calls for.

Cast on 40 sts

Rows 1-4 - Knit all sts
Row 5 and all odd numbered rows - K2 *Sl 1 wyif, K1* to last two sts, K2
Row 6 and all even numbered rows - K2, Purl across to last two sts, K2
Continue repeating as in rows 5 and 6 until the desired length is reached, minus 4 rows.
Last 4 Rows - Knit all sts
Bind off loosely and weave/tuck loose ends

Sl 1 wyif = slip one stitch with your yarn held to the front, as if to purl

Knit away and enjoy!

Please excuse the less-than-stellar photo quality. I had a sleeping pooch in my lap. 

Tuesday, July 9, 2013

Boggy Hollow Loves Our Local!

Our little farm was just accepted as a vendor at the Love Our Local street fair here in Olympia. It's a one-day event, August 25th from 1-9, so it's going to be a long, hot day, but we're totally up for it! we're going to be selling our farm produce and my crafty swag too, so this will be a very interesting bellwether for our future farm, bazaar and market endeavors. 


I anticipate that we'll have a boatload of produce on offer, if the size and staggering growth rate of the zucchini, tomato and corn plants are any kind of indication... :) Now I just need to look through my knits and other assorted crafty goods to see what I have on hand that looks like it will jive at a peak-of-Summertime sale. In other words, no scarves. My wheels are turning. It'll be nice to have a "bazaar" that isn't smack in the middle of the holiday crush for a change.

For more info on the when and where of the Love Our Local market, visit loveourlocalfest.org

I really hope to see you there!

Thursday, May 2, 2013

DIY Magnetic Mason Jar Spice Rack

I bought a case of these little 4 ounce jam jars because I fell in love with how cute they were. I was planning to save them for Jam-o-rama 2013, but in the ensuing lull between planting fruits and picking them and turning them into some of our fabulous jam, I found another project that captured my fancy - a magnetic spice rack.

I probably originally got the idea for this from Pinterest or from someone else's blog - I don't remember - but once the idea started percolating in my noodle, I decided that the jars would have a different destiny than originally planned.

Here's my step-by-step photo how-to for making your own DIY Magnetic Mason Jar Spice Rack:


Paint or label your jars to your liking. I used some chalkboard paint, because it was what I had handy.


Even though these are painted with chalkboard paint, I decided to label them with metallic-colored sharpie pens instead of chalk. Have you ever tried to write tiny with chalk? It either doesn't fit, isn't legible, or wears off every 10 seconds. No thanks.


In addition to your freshly labeled jars, you'll need a corresponding number of small, strong magnets, some super glue, and a piece of sheet metal that will fit your specs - this is 6x18".


Put a wee little drop of super glue in the middle of your lid. Carefully place your little magnet on the dot of glue. Be careful! The strong little magnets tried to jump right out of my hand onto the lid willy-nilly. And between the strength of the magnet and the super glue, there'd be no moving it from where it lands. Go slow.


Affix your sheet metal under a cabinet, on the inside of a cupboard door or wherever else it'd be handy to have your spices hanging. (I have not attached mine yet, I held it in it's eventual resting place just for this pic. I'm leaning towards using Liquid Nails or Gorilla Glue to attach the sheet metal to the bottom of the cabinet, but the hubs wants to use screws. I'm afraid they'll go through, into the cabinet itself. I'll update with whatever we end up using.)

And that's it! I paid $9 for the jars, $4 for the magnets, and $14 for the sheet metal (which I now realize that I could have sourced a LOT cheaper - d'oh!) for a total of $27 for this project. If you already happen to have some jars on hand that you'd like to use, you could cut the cost by 1/3. Have fun! :)

Sunday, April 14, 2013

Craft-a-palooza!

With the much anticipated return of energy and mobility, following my knee replacement, came a big fat wave of crafting inspiration.

Being a very visually oriented person, I'm a major Pinterest junkie. Right now, it's all bent forks and blue mason jars over there and I'm digging it!

People have found uses for mason jars that never even crossed my mind - pendant lights, hand soap pumps, sconces - you name it. And all this time I though they were just for canning and for hosting my uber-grande ghetto macchiato.


32-ounces of Mmm, Mmm Good. :)

I, like everybody else, it seems, really like the old, bluish and greenish mason jars of my Grandma's era, which are quite a bit harder to come by. I priced a few at some local antique malls....GAH! $19 for a single pint jar. Has the world gone mad?!

So, I was super stoked when I saw/heard that Ball Mason was putting out a 100th anniversary edition of their blue jars. They are still a little hard to come by, but amazon carries them presently. I predict that once my fellow crafty folk get wind of these babies, they will fly right outta there, so, if you're so inclined, get some while the getting is still good!


So I did what any crafty hoarder would do, and ordered four cases of them. I have some pretty grand plans for these lovelies. If they turn out at all decent, I'll post pics and I *may* do a giveaway as well. Stay tuned!

Aside from Mason jar mania, I'm pretty excited to try one of these bent fork projects -


I bought some random, el cheapo, non-silver forks from Goodwill to work with in an attempt to hone my skillz a little before destroying serviceable silverware. We'll see how that pans out...

I'm just so, SO glad to have a shred of my former creative, happy energy back, following all of this downtime and pharmaceutical fog. Dare I say I feel somewhat optimistic and.... generally happy today?

Brace yourselves, people of Etsy/Pinterest/the interwebs - Mama's got a new camera and she's feeling mighty crafty. Yarn/jar/fork explosion forthcoming....


Tuesday, March 19, 2013

Setting Goals for Farm Income - Phase 1

In the past few years I've read dozens of books about how to sustainably, efficiently and effectively make money from your backyard garden/small urban farm. I always walk away from those books all charged up about how we're going to run our farmstand, and what all we can offer up for sale there. Then crazy things like last May's car accident happen, and we suffer a big ol' setback. Not this year - I'm determined.

Someday, it'd be lovely if this farm alone provided us with enough income so that Bill could retire from his real job and work here at home instead, side by side with the new and improved me, milking goats, weeding the garden and picking apples. I'm not really sure exactly what it would take to make that happen though.

If you're a fan of the show The Fabulous Beekman Boys, then you'll know that they have been working toward a similar goal as us. Somehow or other, they arrived at the conclusion that they'd have to sell a million dollars worth of food/soaps/farm tchotchkes in order to offset Josh's nine-to-five income and allow him to work on the farm full time. I'd love to know how they came up with that number, and I'd like to figure out exactly what our magic number is, but I don't have the faintest idea how to work that out.

Instead, because I really need to set an attainable goal for myself after this past year of missed opportunities and failure, I'm starting low - $5 per day.

Even before we get our farmstand up and running, I figure that I can produce at least $5 worth of salable product each day with my knitting. A single dishcloth goes for $4, and I can easily turn one out per day. A pair of bike helmet earmuffs can also be done in about a day, and sells for $15, covering me for three days if I should somehow fall behind. It is an extremely small goal, but, when regarded in the context of a full calender year, gives me over $1800 worth of knitted inventory to offer at my bazaars and online. Assuming that 50% of that is profit, I can make us $900 doing something that I thoroughly enjoy and that relaxes me. Pretty cool!

And so, that is what I've committed myself to so far. When I have a clearer idea of how much honey and wax that our beehives will give us, how much produce we can grow and sell, and how much soap we can produce with our goats milk and homegrown botanicals, I will set production and income goals for those areas as well. But for now - small, teensy, microscopic potatoes are all that I can honestly commit to. Every successful business has to start somewhere, right?

Friday, December 21, 2012

Surviving Winter Break: The Tween Edition

Trying to keep a pair of 9 and 12 year old girls productively occupied and not bickering during a two week break from school is a tall order. Here we are on day three and we're already starting to unravel a little...uhg.

So, here are some things that I have done, and others that I've tentatively planned, all in an effort to keep peace in our wee kingdom.

Baking - We made these frosted pumpkin cookies on the first day home together. They are delicious and not too fussy a recipe, which made baking these with the 9 year old actually enjoyable. Madness!

Crafting - We made suet (actually, lard) cakes for both the wild birds and our chickens.

Chicken scratch, oats, dried fruit, poppy seeds, peanut butter and lard, mixed together and pressed into hollowed out orange peels and set up in the fridge to firm up = birdie delights.

Threaded with a little biodegradable cotton yarn, and hung up high enough that the dog couldn't snatch it up and eat it himself (the lard smells very tasty), our little cakes are ready for the finches and chickadees to enjoy.  This one is hanging in our giant old apple tree.

Distraction - I bought a dvd of their new favorite "old" movie, The Goonies, that I'm holding back for a time when I can't take the I'm borrrrrred's any more. Now I just have to resist the urge to give it to them immediately, lest they burn themselves out on it too quickly.

Distraction #2 - Their Pop is lined up to take them to see The Hobbit this weekend, during which time I'll be at home luxuriating in 3 solid hours of silence. Have I ever been so happy to be raising nerdlings? I doubt it.

That's what we have on deck to get us through the first week. We're hoping for - nay - counting on their Christmas gifts to keep them sufficiently occupied for the second week. 

In the event that they fail (don't do me like that, Santa. You owe me, fat man!), I've got my Costco-sized bottle of Baileys and a pair of noise-cancelling headphones at the ready. ;)

Friday, December 7, 2012

How to: Paper Snowflakes


Now, I know that making paper snowflakes isn't rocket surgery, but some of us learn better with a visual aid, which is why I'm posting this here How to.

Paper snowflakes in the front windows during the Winter months are a long-standing tradition in my family. My sister and I grew up with a single Mom and a tight budget, so we learned to make our own fun when we could. Mom's office had a ginormous dot-matrix printer that used 15 inch(?) wide green and white striped, accordion-folded reams of paper. For some reason, the printer would always spit out two blank pages after every print job. My Mom's boss gave her the green light to bring the wasted sheets home for us kids to use as coloring paper. I still have some of that pretty epic artwork scratched on those place mat-sized pieces of paper. I could draw ducks like nobody's business back in the day.

Those awkwardly shaped, oddly-striped pieces of waste paper ended up being our first snowflakes too.

Nowadays, the girls and I just rob the printer in my husband's home office blind. But we're doing it in the spirit of the SPREADING JOY, dang it!


Monkeys against a backdrop of snowflakes, Christmas morning.

What you'll need-

*standard printer paper (or re-purposed wrapping paper scraps, sales flyers, etc.)
*scissors
*scotch tape for hanging them


Step 1: Squaring up your paper -


Fold bottom edge of page up to touch a side. You will have made a large triangle. See that extra bit that wasn't folded? Trim that piece off.


Now you have a perfect square!

Step 2: Fold the square in half along the same crease you made when making the initial fold to square it up. It is now folded in half.

Step 3: Fold it in half again. Now it's in 4ths.


Step 4: Fold it in half one last time. It is now folded into 8ths. You should have one side of your triangle which is a single, solid folded edge (side one), a side that has two folded edges (side two) and a side that has all cut ends of the paper (side 3).


Each of the facets of the "flake" need to be treated differently. This is where a small mistake can lead to a giant pile of pretty scraps instead of a gorgeous finished snowflake.

Side One - This is the side of the folded paper that holds things together. If you go to bananas with the scissors, your snowflake will either be very fragile or will fall apart completely. I try not to cut away too much more than 50% of that edge.

Side Two - This side also contains folds that hold things together, but isn't as critical as the connections on side one. I'd probably cut a maximum of 75% of this edge.

Side Three - This edge is all cut ends (what will be the outer edge of the snowflake), so there are no folds to preserve. Go crazy and cut 100% of it if you want.


First cut on side one. I want this snowflake to be kinda-sorta frilly, rather than strictly geometric, so I'm going with bends and curves.


Finished cutting. I cut maybe 30% out of side one, 75% out of side two, and 80% or so of side three (a very subtle dish shape). Now the unveiling begins!


Open slowly! You don't want to tear your lovely creation.


Et viola! A lovely, festive, one-of-a-kind paper snowflake.


This is a great craft for those long, cold days of Winter break at home with the kids. Be creative and have fun!

Sunday, December 2, 2012

Bazaar Season Breakdown


I learned a lot with last year's bazaar season - affordable, useful objects sell, and spendy-ish, upscale items don't, at least for me. I tried to learn something from that and to focus my time, energy and money on making more of the items that seemed to be in demand last year - washcloths and bike helmet earmuffs, while eliminating the high-end (and high overhead!) apparel items that didn't sell - scarves, mostly.

So this year, I made roughly triple the number of washcloths as last year, 35. We sold all but 7 of them. We sold roughly the same number of bike helmet earmuffs as last year, but, same as last year, the "feminine" colors (pink and purple) didn't move. Lesson learned - people like their noggin warmers in gender-neutral brights and earth tones.

Our Booth at Lincoln Winter Market


I did not offer any jars of jam for sale this year, as I'm not sure that a) With new cottage food laws in place, and me not yet certified, that my selling any sort of prepared foodstuff would be be entirely legal, and b) $3 for a half pint jar might sound like a reasonable price to the buyer, but the maker/sellers breaks even at best.

This was our first year making and selling our soaps and accompanying frou-frou. The soaps, especially the Homegrown Lavender, sold like hotcakes, even at $5 per bar, and with a LOT of competing soapmakers at both bazaars. Ours was the only goat milk soap that I saw for sale though, so between that and what I think of as our handcrafted, cute, genuine factor (imperfectly cut bars, hand wrapped packaging), I think we did pretty darn well and recouped our initial investment in soapmaking supplies and materials.

Our very first batch of soap - Orange Cream

The accompanying products (scrubs, fizzes) weren't super sellers, but the profit margin per sale makes them worth keeping. I'll make a few next year, but focus more on the soaps and washcloths, as they are they main attraction.

Another note with regard to the goats milk soap - we made a few potentially valuable contacts with some fellow crafters and soapmakers who expressed interest in buying/trading for some of our goats milk to include in their products (NOT to consume!). Imagine this goat thing actually paying for itself someday - crazy! Maybe I can use this to justify my longing for alpaca/fiber goat/sheep ownership to the spousal unit? One critter at a time...

These numbers are rough, as I'm admittedly a shoddy record keeper. Just to give you an idea of how a tiny, homegrown hobby can maybe(?), someday(?) grow into a small business...

Last years sales - $185
This years sales - $326.75 (Plus another $50 incoming for custom orders)

So, we doubled our sales from last year to this. With any luck, next year we double this years numbers at least.

We hope to get our farmstand up and running sometime between now and next Summer at the latest. Hopefully the products, business cards and relationships that we made and exchanged at these bazaars will be something of a springboard for our little stand. I think we've discovered a niche, now to expand on that, explore further ventures and make a little money while doing what we love. The future is bright. :)

Friday, November 30, 2012

Knitting Project: Zig Zags Dishcloth

Yep, another dishcloth pattern! I guess they're kinda my thing.


These are so quick and simple to make and people honestly love them. These are my absolute best sellers, year after year.


I recently posted a similar pattern, the Chevrons Dishcloth, based on a stitch that I learned from a knitting encyclopedia. This Zig Zag dishcloth has a more compact design, and the line runs vertically through the piece, rather than horizontally. 


Not that it'll set the world on fire, but I'm proud to say that this stitch pattern is a GGG original. So, enjoy. Happy knitting!

Zig Zags Dishcloth

*Cast on 36
Rows 1 & 2 – K all sts
Row 3 – K2 *K3, P1* to last 2 sts, K2
Row 4 – K2 *P1, K1, P2* to last 2 sts, K2
Row 5 – K2 *K1, P1, K2* to last 2 sts, K2
Row 6 – K2 *P3, K1* to last 2 sts, K2
Row 7 – K2 *P1, K3* to last 2 sts, K2
Row 8 – K2 *P2, K1, P1* to last 2 sts, K2
Row 9 – K2 *K2, P1, K1* to last 2 sts, K2
Row 10 - K2 *K1, P3* to last 2 sts, K2
Repeat rows 3-10 until desired length is reached, less two rows.
Last 2 rows – K all sts.
Bind off loosely.

If you find any errors or have any questions, feel free to drop me a line. If you want to forgo the knitting and buy some finished dishcloths, you can find me on Etsy as Postmodern Milkmaid, or shoot me an email/leave a comment and I'll hook you up! ;)

Wednesday, November 28, 2012

Knitting Project: Chevrons Dishcloth


Our family uses these primarily as dishcloths (and as goat udder-washer-uppers), but there's no reason that you couldn't use these as washcloths too. I use 100% cotton, and try to stick to patterns that are simple enough to memorize (no looking back and forth from the pattern to your work all day), and "nubbly" enough to really get in there when you're using these to scrub the holy heck out of something - be it dishes, your face or...goat parts. ;)

This is a fairly new design for me, but it has been selling well, and with the chevron design craze (search chevron on Pinterest and see for yourself) I thought I'd better capitalize on this good thing while I could. But, it'd be rude to keep such a fun and easy knit to myself, so here you go, the Chevrons Dishcloth.

The pattern gets lost a little on variegated yarns, as you can see from my crummy cell phone picture. I'd recommend solids for this pattern.

*Needles: size 7 straight needles (I use a 24" circular needle, so I can smoosh my work into the middle of it when I set it down, as to not drop stitches off the needles. It works!)

*Yarn: 1 ball Kitchen Cotton, such as Sugar 'n Cream or Coolspun Cotton

Cast on 36 sts

Rows 1 & 2 - Knit all sts
Row 3 - K2, *P1, K3* to last 2 sts, K2
Row 4 - K2, *K1, P5, K1, P1* to last 2 sts, K2
Row 5-  K2, *K2, P1, K1* to last 2 sts, K2
Row 6-  K2, *P2, K1, P1, K1, P3* to last 2 sts, K2
Repeat rows 3-6 until piece reaches desired length, minus 2 rows.
Last 2 rows - Knit all sts
Loosely bind off all sts.

You can eliminate the first two and last two rows of knit sts, as well as the k2 at the beginning and end of each row if you do not want a selvedge edge. I think it makes the cloth look more finished though. ;)

That's it! Happy knitting!!!

Saturday, November 17, 2012

Countdown to Bazaar Season 2012

Less than a week to go before bazaar #1, the Lincoln Winter Market. And so, I'm running around in a tizzy, trimming and wrapping soaps, tucking and tagging knits and trying to plan my table layout. These bazaars are a lot of fun, but man, are they a lot of leg work too!

Tonight's job - wrapping the Orange Cream soap.


It is slightly labor-intensive, having to wrap each bar in parchment, band them with card stock, make a label for the front of the bar (big props to Tehlia for making me the gorgeous fluffy-butt hen stamp!), affixing a hand-written ingredient list and tying the whole bundle up with string. No wonder I only got 8 wrapped before I called it a night.

Tomorrow, lots more soap wrapping and sugar scrub mixing and packaging. If this stuff doesn't sell, we'll have a lifetime supply of soap & exfoliants. We'll be the cleanest, smoothest farmers EVER. ;)

Monday, September 17, 2012

Knitting Pattern: Climbing Vines Dishcloth

I've been knitting like a fiend lately, stockpiling inventory for my bazaars and farm stand, as well as for Christmas gifts. This is a little dishcloth pattern that I improvised, which I call Climbing Vines, as it reminds me of the fields of tall and narrow hops vines that we passed on our drive through Eastern Washington. It is a breeze to knit up, and the finished cloth looks pretty sharp, if I do say so myself!


What you'll need:

*Cotton, linen or hemp yarn, about 60-70 yards (I use Sugar & Cream kitchen cotton most often, because the price point keeps my costs reasonable.)
*Pair of size 8 straight needles, or a single size 8 circular needle.
*Scissors & Crochet hook for finishing

Cast on 36 stitches

Rows 1-3: Knit
Row 4: Knit 3, *P1, K3* to last 4 sts, K4
Row 5: Knit 2, P across to last 2 sts, K2
Row 6: Knit 4, *P1, K3* to last 3 sts, K3
Row 7: Repeat row 5
Repeat rows 4-7 until piece measures your desired length, minus 3 rows.
Last 3 rows: Starting on wrong side, knit all sts.
Bind off loosely and tuck in ends.

Finito! :)


Monday, January 30, 2012

Upcycled Crafting: T-shirt Headband

I have been having a mad love affair with Pinterest for the past few months. Have you too been sucked into it's shiny orbit?

In the event that you have not, Pinterest is "virtual pin board" loaded with brightly colored images of DIY projects, striking photographs, fashions finds and more. It goes beyond eye candy; for an easily dazzled thrifty crafter like me, it's more like eye crack.

And so, I've been self-medicating with gorgeous photographs of other folks' art and craft projects, and have pinned a whole mess of DIY goodies and crafts that I want to try my hand at. Today's venture was the "T-shirt Headband", using a few of my favorite elderly t-shirts.

The process is explained completely here, though I still had to find a YouTube video to get the hang of a 5-strand braid.

My first attempt was a herringbone-type braid, using 5 strands of 1" wide fabric (the salmon colored braid), followed by two goes with the 5-strand braid as shown in the video. They came ok for a newbie, I think -


The t-shirts that I used were probably not the best suited for this project. They had lost some of their elasticity in their old age, and the strands didn't really curl into themselves (as did the strands in the tutorial), leaving me with flatter pieces and the occasional visible raw edge.

I also had a spot of trouble keeping my tension consistent, but now that I feel like I have these braiding techniques figured out, I think my next few tries will come out better.

Lastly, here is my Lil' Peanut modelling my favorite of the lot-


:)

Thursday, September 15, 2011

Yet Another Project in the Works

You know, because goats and chickens and tween-age daughters aren't enough to keep me busy, I've decided to open an Etsy shop. :)

It's called Postmodern Milkmaid, 'cuz I am one of those, or at least I like to think I am. There is a blog associated with it that actually has more content on it right now than my shop does, so for the mean time, I'll direct you there to check out my projects in progress - A Postmodern Milkmaid.

My theme/mantra here is to use 100% recycled/found/landfill-bound materials, and to not have to purchase anything at all to complete my projects. All yarn will be leftover or reclaimed yarn, same goes for fabrics, etc.

I welcome your feedback and suggestions. Be honest, but, please, oh please, not too brutal. I need true feedback, but I am still a fragile wee thing (mentally) and can take uber-blunt feedback a little too personally.

Anyhoo, wish me luck. And thanks, as always, for reading my ramblings and coming back for more. ;)

Chelle

Thursday, September 1, 2011

30 28 Hats in 31 Days

My challenge to knit 30 hats in 31 days for the Period of Purple Crying's educational campaign against Shaken Baby Syndrome has drawn to a close, and I missed my goal by thismuch - two little hats, to be exact.

Still, 28 hats in a month is still a respectable number. That's an over-sized kindergarten classroom's worth of heads that will hopefully be rendered both warm and safe via my hats and the information provided to their parents about how to safely deal with episodes of intense crying. I feel pretty good about having done my bit in that. :)

I'm slightly relieved to have a break from my frenzied knitting. I think that no one is as relieved to see me reach the end of this challenge as my husband is. He saw my staying up late, knitting on the go and otherwise shoehorning yarn and needles in every spare second I had as a small but omnipresent stress and distraction. I'll say this for it, it was my chief downtime occupation this month. My normal sitting-on-my-tush chores, like folding laundry, have suffered somewhat from being sent to the back burner for 4 1/2 weeks. Fear not, crunchy towels and socks - Mama's back! ;)

A picture of all 28 hats, followed by some close-ups of a few of my favorites of the lot. :)


This is actually a self-striping sock yarn. It was a breeze to work with and I loved not having 7000 ends to tuck in!


The eggplant


I've been calling this one Boysenberry Swirl. Does this hat look like a dish of Fro-Yo or what? ;)

Sunday, August 7, 2011

Knitting Like There's No Tomorrow

But there is a tomorrow! And if I don't finish at least one hat before then, I have officially fallen behind the curve to reach my goal of 30 hats in 31 days. I'm about 7 1/4 to the good. Here are the finished (but not tucked) seven -


Simple cables, stripes, the eggplant, preemie ribbed stripes, purple knot-top, simple two-color, lavender and navy stripe

I'm having a bit of trouble making primarily purple hats that look suitably boyish. Any thoughts?

Are you knitting, crocheting or sewing along with my challenge? Show us your hats! :)

Friday, July 29, 2011

Knitting for Babies - 30 hats in 31 days?

Since our Farmer Feed Thyself Challenge has been indefinitely postponed due to underwhelming garden production, I've decided to take on a different challenge for the month of August. I'm going to try to knit 30 newborn baby hats in a month.

Why, oh why would I want to knit my ever-loving booty off in the middle of summer, you ask?

I'm knitting hats as part of a newborn hat drive for an educational campaign called The Period of Purple Crying.

The organization's goal is to educate new parents and caregivers of infants about a normal developmental stage (from about 2 weeks of age to 4 months) in which babies cry more often and more intensely, which they refer to as "Purple Crying". Knowing that this is a normal behavior, and knowing how to properly cope with the frustration that a wailing baby can cause is a critical step in reducing instances of Shaken Baby Syndrome and Abusive Head Trauma in infants.

The little purple hats will go home with newborns, along with information on identifying and coping with Purple Crying. The idea is to have a reminder right there on your sweet baby's noggin that his or her crying is ok, and like all developmental hurdles, shall pass in time.

Knitting is my therapy anyway, so knitting to save a life is practically nirvana in my book. ;) I encourage you to join me in making as many wee little hats as you have time to make - knitted, sewn or crocheted. The guidelines for the hats are as follows -

•Caps should be made using clean and NEW YARN any shade of PURPLE yarn. Other colors of yarn may be incorporated into the cap, but a shade of PURPLE should encompass at least 50 percent of the cap.

•Yarn and thread labeled, as "baby friendly" should be used for caps.

•Infant heads come in a variety of sizes. As a general rule, caps should have a circumference between 10.5 - 13.5 in. and a height of 5-6 in.

•Please refrain from including “pom poms” or any type of strap to secure caps to baby’s heads. These pose a potential choking and/or strangling hazard to babies.
You can find patterns for PURPLE Caps at www.clickforbabies.org under the Knit Section.

Finished hats can sent to any of the hospitals listed on the clickforbabies.org website. Mine will be divvied up between Legacy Emanuel in Portland, where a family member works, and Mary Bridge Children's Hospital in Tacoma, where my oldest was born. Please knit, crochet and sew along with me and use your creative energy to change lives!

FYI - I'm starting early. 3/4 of a hat done so far. 29 1/4 to go! :)))

Tuesday, December 21, 2010

Scarlet, the Chirping Knitter

Most of my posts lately have been knit-centric, mostly because at this time of the year, pretty much every year, my life becomes knit-centric.

I learned to knit when Olivia was a toddler, about 9 years ago, from my husband's Aunt Janet. Yes indeed, I learned to knit from Janet Jackson. How many people can say that???

Ok, ok, she's not that Janet Jackson, she's way better. :) She taught me one of the most useful and satisfying skills that I have, and I've since been able to pass the joy of knitting on to others myself, most recently, my baby girl, Scarlet.


I was showing her the knit stitch, and when pulling the new loop of yarn through the existing stitch, I advised her to keep her right hand needle in contact with the left hand needle, so that the stitch wouldn't slide off. I told her that they should rub together like cricket legs.

Later that day as she sat knitting, I heard her mumbling under her breath, talking herself through each phase of the stitch, upon reaching the "cricket legs" phase she whispers "bbeeeeed-deet", in imitation of a cricket's chirp.

Just when you think you can't love your kiddo anymore, they become hyper-focused little knitters, chirping in earnest. My heart is fit to burst with sappy love over this girl. I am one proud mama today. :)

Wednesday, December 15, 2010

The Maniac Manic Knitter

Ten days 'til Christmas, and I still have three projects left to finish and four to block. Why do I punish myself so?

Today's project was an earflap hat for one of Olivia's teachers who is a MAJOR San Diego Chargers fan. Here's my baby, the Football Fan Earflap Hat-


I improvised/designed/whatever-you-want-to-call-it this hat myself, so there is no proper pattern to post, at least at this point. I'm hoping to write it up soon, but in the mean time, the basic project outline is up on Ravelry.

Ok. Falling into bed now. I get to wake up bright and early with kiddos, then dive head-first back into Craft Cram-a-thon 2010. Woohoo!